Programming Reference/Librarys
Question & Answer
Q&A is closed
Sometimes you need or want to load a UIWebView displaying content provided with an app. If there is more then one site it might make sense to have an external .css or .js file for all your html content. Whatever, I was facing this problem currently and decided to provide my solution to you.
If you're following this example it is necessary that you are familiar with XCode and UIWebView-Basics.
First we will create the project. Open up XCode and click File→New→Project.
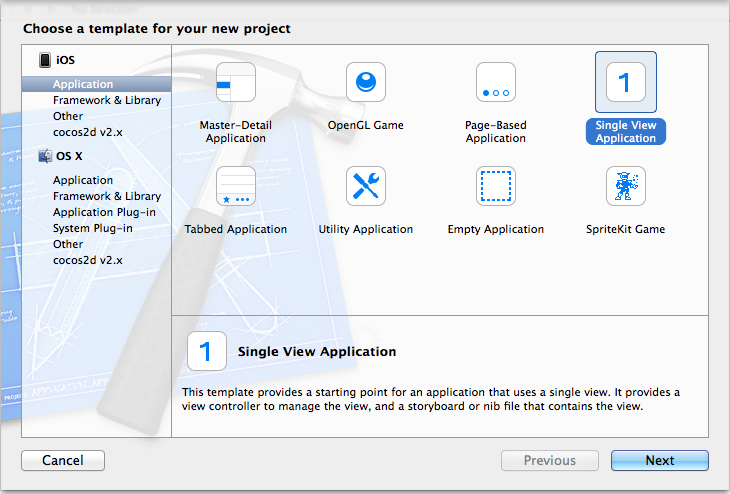
Single View Application is the template we want for this purpose. Select it and click next. Now provide a name for your project. I named mine 'UIWebViewSample'.
In the ViewController.m and make your interface declaration at the top look like this:
@interface ViewController () <UIWebViewDelegate>

@property(nonatomic, strong) IBOutlet UIWebView *webView;
@property(nonatomic, assign) IBOutlet UIBarButtonItem *backBarButton;

@end
Next we will add some code to load the webView and make the backBarButton usable.
- (void)viewDidLoad
{
    [super viewDidLoad];
	// Do any additional setup after loading the view, typically from a nib.

    // ** FIX FOR iOS 7 **
    if ([[[UIDevice currentDevice]systemVersion]floatValue] >= 7.0) {
        self.automaticallyAdjustsScrollViewInsets = NO;
    }

    // ** SET NAVIGATION ITEM DISABLED **
    _backBarButton.enabled = NO;

    // ** DECORATE WEB-VIEW A BIT **
    _webView.layer.borderWidth = 3.0f;
    _webView.layer.borderColor = [[UIColor grayColor]CGColor];

    // ** LOAD WEB-VIEW **
    [self loadWebView];
}
- (IBAction)navigationButtonAction:(id)sender {

    if ([sender isKindOfClass:[UIBarButtonItem class]]) {
        UIBarButtonItem *buttonItem = (UIBarButtonItem *)sender;

        switch (buttonItem.tag) {
            case 0:

            [self loadWebView];
            _backBarButton.enabled = NO;
            break;

            default:
            break;
        }
    }
}
- (void)loadWebView {

    // ** GET BUNDLE-PATH TO BUILD THE 'baseURL' **
    NSString *bundlePath = [[NSBundle mainBundle] bundlePath];
    NSURL *baseURL = [NSURL fileURLWithPath:bundlePath];

    // ** GET PATH-STRING OF 'index.html' FILE **
    NSString *filePath = [NSBundle pathForResource:@"index" ofType:@"html" inDirectory:bundlePath];

    // ** GET HTML-STRING OF FILE **
    NSString* htmlString = [NSString stringWithContentsOfFile:filePath encoding:NSUTF8StringEncoding error:nil];

    // ** START LOADING WEBVIEW WITH 'htmlString' AND 'baseURL' **
    [_webView loadHTMLString:htmlString baseURL:baseURL];
}
Here is already the first thing to make refer to local files work. Instead loading the webView with a request, we're loading the webView with the UIWebView-Method 'loadHTMLString:(NSString*)htmlString baseURL:(NSURL*)baseURL'. The htmlString is a string we are getting out of a html-file. The baseURL is the bundlePath. A NSBundle object represents a location in the file system that groups code and resources that can be used in a program. Resources (images, css- and javaScript-files) inside your application bundle are at the root of the bundle, even if you place them in an separate group (folder) in your project.
- (BOOL)webView:(UIWebView *)webView shouldStartLoadWithRequest:(NSURLRequest *)request navigationType:(UIWebViewNavigationType)navigationType {

    if (navigationType == UIWebViewNavigationTypeLinkClicked) {
        _backBarButton.enabled = YES;
    }

    return YES;
}
If a link in the webView is clicked, this method enables the barButtonItem to make it work and possible to go back to the index.html, the first site we will load.
So now we need to go to the Interface-Builder or Storyboard and add a UIWebView and UIBarButtonItem. If you are not using Storyboard it is enough to add a UINavigationBar and on it place the UIBarButtonItem. If you are working with Storyboard add a UINavigationController and make the ViewController the initial(RootViewController) ViewController of the UINavigationController. This will cause that a UINavigationBar gets added to the ViewController. Add the UIBarButtonItem on it.
We created two IBOutlets(webView and backBarButton), connect them with the objects we just added to the view. Do not forget to connect the delegate of the UIWebView to the ViewController.
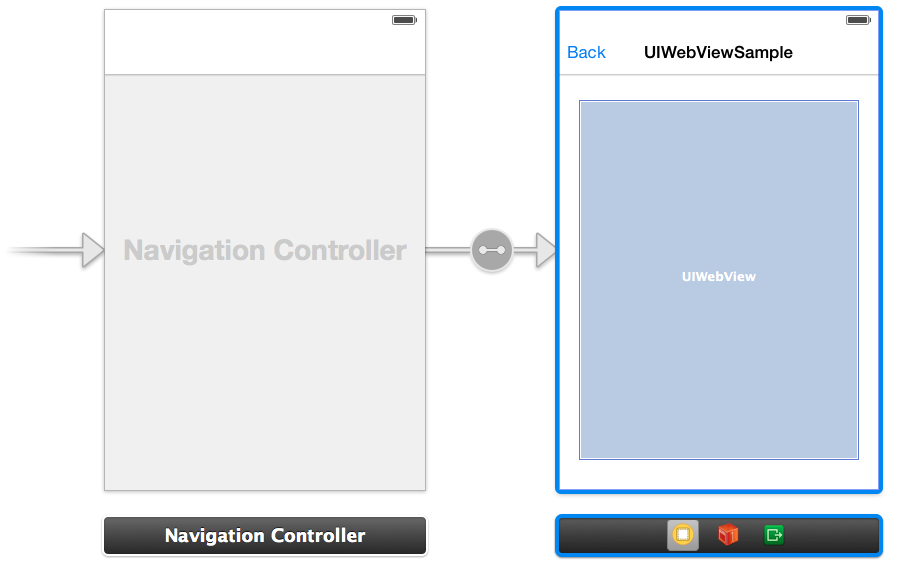
The last thing to do is add some resources.
Add an image. Mine is vmax.jpg.

Right-click or ctrl-click on a group or folder. In the pop-up click new file. Select iOS:Other→Empty and create and name like the following. Repeat and copy-paste below code to each file.
<!DOCTYPE HTML PUBLIC "-//W3C//DTD HTML 4.01 Transitional//EN"

<html>

<head>

    <title>UIWebView Sample</title>

    <meta name="author" content="Jens Amir Gheraoui">
    <meta http-equiv="content-type" content="text/html; charset=ISO-8859-1">
    <meta http-equiv="content-language" content="de">
    <meta http-equiv="Content-Style-Type" content="text/css">

    <link rel="stylesheet" type="text/css" href="styles.css">
    <script type="text/javascript" src="main.js"></script>

</head>


<body onload="showAlert('Onload js-call from index.html')">

    <div id="mainDiv">
        <div id="elementsDiv">
            <div id="internalLinkDiv">
                <a href="secondSite.html">Internal Site Link</a>
            </div>

            <div id="externalLinkDiv">
                <a href="http://www.yamaha-motor.eu/de/products/motorcycles/index.aspx">External Site Link</a>
            </div>

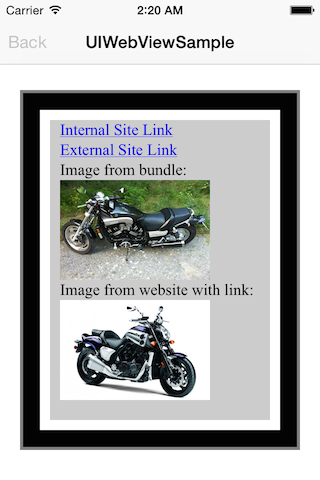
            <div id="internalImageDiv">
                Image from bundle:
                <img src="vmax.jpg" width="150" height="100"></img>
            </div>

            <div id="externalImageDiv">
                Image from website with link:
                <a href="http://www.yamaha-motor.eu/de/products/motorcycles/sport-heritage/vmax.aspx">
                    <img src="http://www.cpuhunter.com/wp-content/uploads/2012/10/2013-Yamaha-VMAX-600x398.jpg" width="150" height="100"></img>
                </a>
            </div>
        </div>
    </div>

</body>

</html>
<!DOCTYPE HTML PUBLIC "-//W3C//DTD HTML 4.01 Transitional//EN"

<html>

<head>

    <title>UIWebView Sample Site 2</title>

    <meta name="author" content="Jens Amir Gheraoui">
    <meta http-equiv="content-type" content="text/html; charset=ISO-8859-1">
    <meta http-equiv="content-language" content="de">
    <meta http-equiv="Content-Style-Type" content="text/css">

    <link rel="stylesheet" type="text/css" href="styles.css">
    <script type="text/javascript" src="main.js"></script>

</head>


<body onload="showAlert('Onload js-call from secondSite.html')">
    <div id="secMainDiv">
        Second Website from bundle
    </div>
</body>

</html>
function showAlert (msg) {
    alert(msg);
}
@charset "utf-8";

body {
    background-color:#000000;
}

#mainDiv {
    position:absolute;
    width: 240px;
    height: 320px;

    top: 50%;
    left: 50%;
    margin-top: -160px;
    margin-left: -120px;

    background-color:#FFFFFF;
}

#secMainDiv {
    width: 100%;
    height: 100%;
    background-color:#FFFFFF;
    text-align: center;
}

#elementsDiv {
    position:absolute;
    width: 220px;
    height: 300px;

    top: 50%;
    left: 50%;
    margin-top: -150px;
    margin-left: -110px;

    background-color:#CCCCCC;
}

#internalLinkDiv {
    margin-left: 10px;
}

#externalLinkDiv {
    margin-left: 10px;
}

#internalImageDiv {
    margin-left: 10px;
}

#externalImageDiv {
    margin-left: 10px;
}
To make the Javascript part work one more thing is necessary:
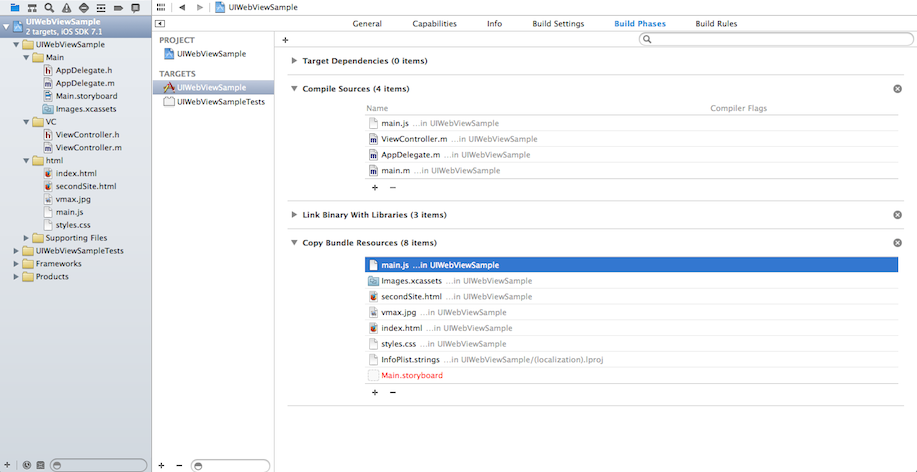
Click on the blue project icon at the top of the project-navigator on the left and then under targets select the target with name of your project. Find 'Build Phases' and add the main.js to 'Copy Bundle Resources' while clicking add(+) and select your .js file. And that's it!
Run the project and you should see somethings like this. A Javascript call and the index.html after closing the alert:
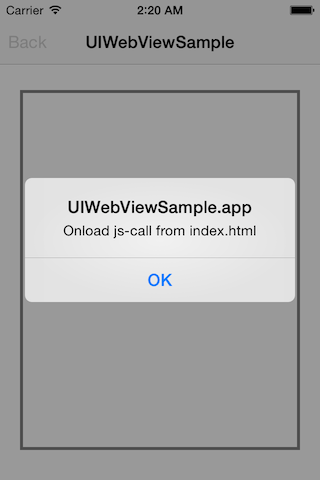
I hope this will help somebody somehow. Took me a while to figure this small amount of how-to out. Happy coding :)
